Documents and editor
The editor is block-based: every paragraph, heading, list item, table and embed is a piece you can retype, re-shape, pick up and move on its own.
Everything is a block
Type into the page and press Enter for the next block. A block knows what it is — paragraph, heading, list item, quote, callout, code, divider, image, table — and every one of them can be turned into another later.
Enter inside a list continues the list, and pressing it on an empty list item ends the list instead of adding a blank bullet. Shift+Enter breaks the line without inheriting the block: it gives a plain paragraph, which is how you get an ordinary line under a heading or out of a list.
- 1.Press Enter for the next block, Shift+Enter for a plain paragraph.
- 2.Press Tab to indent a block and Shift+Tab to move it back out.
- 3.Inside a table, Enter moves to the same column of the next row — and makes that row if it is the last one.
The slash menu
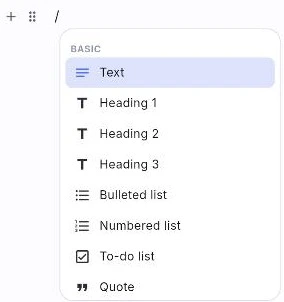
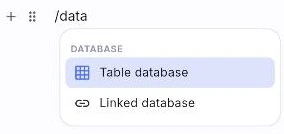
Typing / opens the insert menu at the caret, grouped under headers. BASIC holds Text, Heading 1, Heading 2, Heading 3, Bulleted list, Numbered list, To-do list, Quote, Callout, Toggle, Code, Divider, Image and Table. DATABASE holds Table database, Board, Calendar and Linked database.
Keep typing to filter — the search reads names and keywords, so /todo, /check and /accordion all land where you would expect. Arrow keys move the highlight, Enter or Tab inserts, Escape closes it and leaves the slash behind as ordinary text.
Two entries only appear where they can work. /Page makes a sub-page under this one and drops a link to it in place, so it needs a real page to nest under. The assistant entry appears only on a Cloud workspace with a key configured — an option that always fails is worse than no option.
- 1.Type / anywhere in a block.
- 2.Type a few letters to narrow the list, then press Enter.
- 3.A new toggle arrives closed; a database entry makes a sub-page and opens it in a peek.
Markdown, typed
Block prefixes convert as the space after them is typed: # for a heading, ## and ### for the smaller two, - or * for a bullet, 1. for a number, [] for a to-do, [x] for one already ticked, > for a quote. Three dashes, asterisks or underscores on their own line become a divider.
Inline markdown converts as the closing delimiter is typed: **bold**, *italic* or _italic_, `code`, ~~strikethrough~~. The markers vanish and the text between them keeps the format.
- 1.Type # then a space to make a heading.
- 2.Type **bold** and watch the stars disappear as you close them.
- 3.Type --- on its own line for a divider.
The bar that floats over a selection
Select text and a bar appears above it: bold, italic, underline, strikethrough, inline code, text colour, highlight, alignment, a link, and — where the workspace supports them — comment and the assistant.
The assistant sits at the far left of the bar, then the block-type control — so a selection can be turned into a heading or a list without going back to the slash menu. Colour is a full wheel rather than a fixed palette, and it can be cleared.
- 1.Select some text with the mouse or with Shift and the arrow keys.
- 2.Press a button on the bar; the ones that are on are drawn with a filled wash rather than a colour change.
- 3.Use the link button to attach a URL to the selection.

The gutter, and moving blocks
Hover a block and two controls appear in the left margin: a + that adds a block below, and a handle. The handle's tooltip says what it does — click to open the menu, drag to move.
Dragging carries a faded rendering of the real block rather than a label, so what is being moved is what you see. Drag a block that is part of a multi-block selection and the whole run travels together.
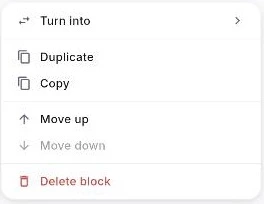
The menu behind the handle offers Turn into, Duplicate, Copy, Move up, Move down and Delete block. Turn into is offered only where there is an honest answer — a divider, an image or an embedded table has no writing to re-shape, so the item is left out rather than shown doing nothing.
- 1.Hover a block and press + to add one below it.
- 2.Click the handle to open the block menu, or drag it to move the block.
- 3.With a block held by its handle, Delete removes the block itself rather than emptying it.
Blocks that hold other blocks
A toggle folds what is under it and arrives closed, because a thing you put away that opens itself asks to be closed before it has been used. A callout draws a tinted box around a run and takes its colour from the same block menu, so a run swept up together is recoloured as one thing.
A code block keeps newlines instead of splitting into a new block, and so does a table cell — Enter inside them means a line, not a new block.
A table grows by pressing Enter in the last row. A rectangle of cells can be selected and cleared in one go.
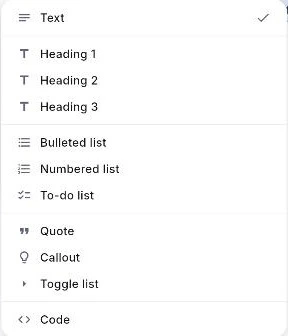
- 1.Insert a toggle with /toggle, then click its arrow to open it — the block menu calls the same thing Toggle list.
- 2.Insert a callout with /callout, then recolour it from the handle menu.
- 3.In a table, press Enter in the last row to add a row.
Find, select, undo
⌘F opens a compact find-and-replace panel at the top right of the editor. It searches every text block in the page, counts the matches, steps through them with the previous and next buttons, and offers Replace and Replace all.
⌘A selects the whole document rather than just the block you are in, and ⌘Z and ⌘⇧Z (or ⌘Y) undo and redo. Copy, cut and paste keep the block structure when the destination is NoteKub.
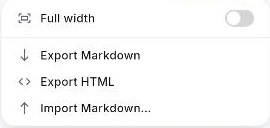
The page's own ⋯ menu, at the top right, is where the whole document goes in and out: a Full width toggle, Export Markdown, Export HTML and Import Markdown — a canvas and a database each add their own formats there. There is no find entry — ⌘F is the only way in.
- 1.Press ⌘F or Ctrl+F, type what you are looking for, and step through with the arrows.
- 2.Type in the second field and press Replace, or Replace all.
- 3.Press Escape or the close button to dismiss the panel.